Sunday, January 1, 2012

Chicken Taco Pizza

Yes, baby!  You read that right!  Lately, I have been craving Mexican food and pizza.  Like seriously craving.  So, last night I was laying in bed and thinking about what I was going to make for dinner tonight and this came to mind!

So simple to make... and this recipe is so versatile.  You can use whatever ingredients you like to make it your own style!

Here's how mine came together...

*Pre-heat your oven to 450 degrees

Ingredients
1 lb ground chicken
1 medium onion, chopped
1 whole wheat pizza crust
1/2 small can fat free re fried beans
1/2 cup taco sauce (about)
1 1/2 cups shredded cheese
2 roma tomatoes, diced
2 cups shredded lettuce (about)
1/2 cup taco seasoning
light sour cream for topping (or plain greek yogurt)
calorie free olive oil cooking spray


Start by pre-heating a pan and spray it with olive oil cooking spray.  Chop the onion up and get it started in the pan.  Cook the onion just a couple of minutes by itself and then...


Add in the ground chicken...


Meanwhile, as the chicken is cooking you can get some other things going...

Measure out a 1/2 cup of taco seasoning....

So, I get that 1/2 cup of seasoning may seem like a lot...
but I like a deep flavor. 
 You can use as little or as much as you prefer!

And prep the crust by spraying it with olive oil cooking spray.  Place it in your pre-heated oven at 450 degrees for about 4 minutes, just to get it going...


And prep your veggies.  For my pizza I only used lettuce and tomato, but you can use whatever veggies you like: green onion, red onion, olives, peppers, etc. 


Then, once the chicken is cooked through, add the 1/2 cup of taco seasoning and 1/2 cup of water (maybe a little more if you think you need it)...


Incorporate the seasoning really well and let it cook into the chicken, about 5 minutes. Be sure to keep stirring it constantly so it doesn't stick.


By now your crust is out of the oven and ready to be loaded!  Start by adding about 1/2 a regular sized can of fat free re fried beans...


Spread the beans all around the crust.  The crust is warm so that will help smooth the beans out and make it easier to spread them all around the crust...


Next, spread taco sauce on top of the beans...


In all honesty, I didn't measure the sauce...I just poured a bit out of the jar and spread the love all around...If I had to guess, I'd say it's about a 1/2 cup... give or take a bit...


Next, top the pizza with the cooked and seasoned chicken...


Then, spread about 1 1/2 cups of shredded cheese atop the yummy deliciousness & pop it in the pre-heated oven (450 degrees) for about 8-10 minutes.  Watch it carefully!  For the last 2 minutes I turned the oven off and the broiler on HI to get the cheese all bubbly and brown and gooey!


And THIS ladies and gentlemen is the result of all that work...!!

Look at all that golden brown cheesy delicousness, just waiting to be devoured!

And again... YUUUUMO!

Let the pizza cool of a bit and then slice it up however you wish.  Then, top it with your veggies and serve!

Confession time:  I learned the hard way that you should
slice the pizza FIRST and then add the veggies! 
 hahahaha! 

Add a dollop of light sour cream and enjoy!!

Okay, those look like unusually large "dollops", don't they?!?! 
Geesh...


So, here's to you all...wishing you a happy, successful, and loving 2012 filled with lots of yummy & better for you food!


BIG bite!  I am convinced there is no way to try and be cute
 while at the same time stuffing your face for a picture!!

My little sister, Cortney...she says it was good! Her critique
 was that it would have been better with green onion...
Oh, and doesnt she look thrilled to be taking a picture for my blog!!  LOL.
Love you, sister. :)

Give this one a try.  Play with it...make it yours!  I gurantee you won't be disappointed!  Not only is it really uber good, but it's VERY filling too.  WIN!!

So, till next time...

Lots of Love,
Autumn

Saturday, December 31, 2011

Maple-Pumpkin Cheesecake Protein "Milkshake"----CHEERS to the NEW YEAR!

Happy New Year's Eve everyone!  Right now, here in Indy it is about 6:30pm.  So, just a few more hours and we will be ringing in the new year!!!  If I am to be honest...it's more than likely that I will be well into the REM cycle by then!!  I am not much of a party girl, I don't really drink much at all (like, by that I mean I'm under ten drinks---in my LIFE), I am still nursing my knee back to health so I walk REALLY funny, and I am super sleepy because my 17 1/2 year old shih tzu poodle decided to start yapping at 2:30am wanting to go out...& after that I couldn't get back to sleep.  Sigh (rubbing eyes...).  LOL.

I have been thinking a lot today and pondering if I will make any resolutions.  For the past few years I have just done general, non specific resolutions like "take care of myself".  Today, I have noticed that many of my friends on my FB page are putting up lots of positive status' and it has inspired me to make that my resolution.  I tend to be a bit negative or pessimistic at times and about certain things in life, even as a person who is known for being more of a positive person (does that even make sense?!?!).  I think a better way of saying it is that I am easily able to be positive for and about other people, but I am more likely to be negative about myself and the stuff that happens in my life.  Well, going into 2012...I resolve to be more uplifting, positive, happy, thankful, and joyful about ME, MYSELF, and I.  I resolve to turn negativity into positivity about myself, my day to day life, and ALL that it includes & I resolve to be genuine about those feelings!  I am excited to see what 2012 brings for my life.  I know it will bring me the Master's degree I am working on (THANK GOD FOR THAT) and I hope it will bring me continued success in taking care of myself, mentally, physically, and emotionally.  As always, I am a never-ending work in progress.  :-) 

So, what are your resolutions folks?  I'd love to hear from you!!!

As I have been sitting at home today relaxing and resting my knee (boy, was it upset with me after I went to Wal-mart earlier....that walking made it swell up HUGE!  But, were okay now...I've been icing it and giving it a rest the last few hours!!) I took the time to watch the documentary Fat, Sick, & Nearly Dead.  It is eye-opening and nothing short of AMAZING, INCREDIBLE, & INSPIRING...to say the least.  If you have not watched it, I encourage you to do so...ASAP.  As a person who used to weigh 412 pounds I know the pain, physically, emotionally, and mentally, that comes with being a morbidly obese person.  So, when I saw Phil appear in the documentary, I related to his pain.  It's not a good place to be.  When I saw him RUNNING at the end of the documentary, wearing a 2x shirt (down from 6x), having lost 202 lbs...down from 429lbs to 227lbs in TEN months... I SMILED OUT LOUD!  So inspirational and touching!  This documentary is seriously a MUST SEE!  I see myself watching it again...just to really absorb it.  I have already been thinking of investing in a juicer machine after stumbling across a few blogs about juicing over the past few days...now, I am REALLY considering buying one and doing a juice fast.  There seem to be ASTOUNDINGLY GREAT benefits from juicing.  I need to ponder and pray on it a while longer and educate myself more about it so I can make sure it's right for me (also need to talk to my doc and dietitian about it!).

So, any hoo...moving right along.  I did buy myself a new blender today...my old one was shot.  I am trying to get back to having a protein shake everyday so that I know my body is getting plenty of protein.  Lately, I have been using the "milkshake" method that I learned from the www.dashingdish.com website.  It is AWESOME because I feel like I am actually eating something rather than just drinking it.  Since eating is something that I turn to to ease my anxiety (I am NOT saying this as a good thing---b/c it's not, but this is part of my struggle with emotional eating--working on it) this is a great new discovery for me!  The only downfall to it right now...is that...baby, it's cold outside!  My bones ache for something warm to be taken in to warm me from the inside out when it's cold outside.  This "milkshake" protein method definitely provides the exact opposite of that.  BUT, have no fears...once I finish this awesome shake I am about to share with you, I plan on have a nice warm cup of diet hot cocoa to offset it and warm my bones right up!!  WIN!!  :-)

So, here's the shake.  I didn't have a recipe for this prior to making it...part of how I get down in the kitchen is just experimenting and rolling with it and seeing how things turn out.  This is shake is no different!

Ingredients:
2-3 heaping cups of ice (or 1-1/2 trays)  NOTE:  the more ice, the thicker your shake!!
1 scoop vanilla protein powder
1/2 cup fiber one cottage cheese (or whatever kind you prefer)
1 tblsp sugar free cheesecake pudding powder
1 cup water
1/8 cup Libby's pumpkin
1/3 cup unsweetened almond milk (or whatever kind your prefer)
1/2 cap full (a few drops) of maple extract
1 tsp pumpkin pie spice.
3-6 packets of sweetener (whatever kind your prefer)


I found this cottage cheese today at Walmart.  For 1/2 cup serving it has 5 grams of fiber...and 10 grams of protein!  Not too shabby!

Start by putting 1/2 cup of cottage cheese into the blender:


Then, add in the ice.  For this shake I used two heaping one cup servings of ice.  It turned out to be not quite as thick as I'd like it to be...so next time I'll go for 3 heaping cups of ice!


Then, add 1/3 cup of almond milk (or whatever type of milk you like)


Then, 1/3 cup (heaping) of pumpkin...


Then, add 1/2 cap full (a few drops) of maple extract, 1 teaspoon of pumpkin pie spice, 1 tablespoon of sugar free cheesecake pudding powder, and 3-6 packets of sweetener (I used 6--I like sweet!)...


Okay, now that all ingredients except the water are added, PULSE the ingredients several times, giving the ice a chance to start breaking up.  Once you hear your blender NOT pulsing the ice anymore, begin to stream in the water through the spout.  Continue pulsing until all of the ice is broken down (you will be able to hear when this happens).  Then, continue mixing on high speed for a couple of minutes until everything is well combined.


This makes A LOT of shake people... a whole lotta shake!  I poured myself this cup....

...and I still have about half of it left in the blender!

Hopefully I will get to the rest later.  If not, I will give it a shot tomorrow and see how it goes. 

This shake is really good.  So creamy and sweet!  Perfect wake up for the ol' taste buds & super filling---Protein LOADED!!

So...in celebration of New Years Eve and ringing in the NEW YEAR of 2012...I say CHEERS to you all~!  I hope 2012 brings you lots of happy blessings and continued successes!!!

Till next time...

Lots of Love,
Autumn

Tuesday, December 27, 2011

Crock Pot Southwest Chicken...with a kick!

So, yesterday while laying in bed and rehabbing (following knee surgery last week) I was browsing on the RNY forum on obesityhelp.com.  I came across a post by the famous Nik (if you are part of the online bariatric community, you know who Nik is---or you live under a rock...) about southwest chicken.  It sounded simple and easy and I knew I wanted to try it.  It just so happened I had most of the ingredients on hand.  Since I am (or was until today) stuck in the house, hardly able to walk I had my little sister run to the grocery store last night and grab the rest of the things I needed.  I added a couple of things to mine that Nik didn't mention in hers, to spice it up a bit.  :)


Ingredients:
1 lb chicken breast tenders, cut into small pieces
1 jar (small) mild salsa
1 can kernal corn, drained and rinsed
1 can black beans, drained and rinsed
1 brick 1/3 reduced fat cream cheese
2 fork fulls jarred jalapeno peppers (you can add more or less depending on how spicy you like it)


Crock pot cooking is hands down the easiest way of cooking....we've covered that, right?!?!  So, you know this takes close to zero effort and the outcome is DE-LICI-OUS. 

Cut the chicken into pieces and place it into the crock pot...


Add the salsa and fill the jar about 1/3 way full with water. Shake and add that to the crock pot...


Add the sliced jalapenos... as many or as little as you like.  With two fork fulls it gave this dish a nice kick.  I like spicy, so I could've probably been okay with more, but it was still YUMMY!


Open the corn and the beans and drain each, separately and add them into the mix...


Let the crock pot do it's magic on low for about 3.5 hours.  Then, add the block of cream cheese...


Mix in the cream cheese (which by the way is what MAKES this dish)...


Leave it on low for another 30 minutes...


The end result is this....

A warm, creamy, protein and fiber packed, incredibly delicious meal...


This one is another MUST try.  I am seriously hooked.  I've already had two bowls today!  My belly is haaapppy!  Mmmmmm-MMMMM-Mmmmmmm....so so good! 

Thanks, to Nik for the idea!  If you haven't ever seen her sight, check her out at... 

http://bariatricfoodie.blogspot.com/

Even if you are not a bariatric patient, her sight is packed full of great information for anyone trying to lead a healthy lifestyle, lose weight, etc. 

Till next time...

Lots of Love,
Autumn

Monday, December 26, 2011

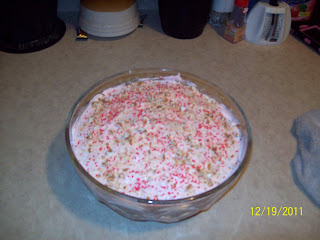
Peppermint Brownie "Truffle"

So, a couple of months back, a close and dear friend of mine (hi, Shannon <3) introduced me to a new website called dashingdish.com  (check the site out at http://www.dashingdish.com/).  I have been hooked since!!  Katie, from dashingdish is not a WLS'er, but she is a person who puts focus on leading a healthy, active, and fulfilling life led by God.  She is drop dead beautiful (totally random, but so true) and very inspirational~!  Her website is FULL of TONS of great information, tips, tricks, recipes, etc that ANYONE can use.  I just love her site...check it out...if you haven't already come across her site, I am telling you, she's one to add to the favorites list and on your FB feed!  Just last night I made a banana protein "milkshake"  using her method.  Oh-EM-JEEEBUS, let me tell you, it was awesome.  It was seriously just like having a milkshake....but with ZERO guilt and TONS of protein!  As far as I can see, there is no going wrong with that!!

So, anyway...During the month of December, Katie shared a series of deserts for the Christmas holiday...her 12 Days of Christmas desert ideas.  ALL of them look amazing and I am sure I will venture to making at least some (if not all) of them at some point....I am a sweets kinda girl.   I just have to have reasons to make things like desserts...reasons that mean I have to take it some where...get it out of my house and therfore out of my reach...to some type of gathering...where there are more people... other than myself... that can eat it....so that I don't eat it... ALL...by myself (aye, aye, aye...I digress, LOL).

It just so happened that, at work, my division had selected days where each unit brought in things to feed everyone for the holidays.  We did it this way this year as opposed to having one big blow out Christmas party.  Now, this idea was a good one and most people LOVED it.  BUT, it was super difficult for me (and I am sure anyone else that struggles with food issues and trying to eat right) because FOOD...lots and lots of unhealthy, fattening, sugar loaded, waist expanding food was in my face for days upon days upon days.  Luckily, I was able to resist the temptation most days.  There was only one day where I indulged in some chocolate dipped pretzels....they were so good...I couldn't resist...and of course on the day my team brought in food, I ate.  Other than that...I played by the rules~!!  :-)

Anyway, my unit was the last unit up and each of us decided on what dish to bring.  I opted to make one of Katie's dishes, the Peppermint Brownie Truffle.  I changed a couple of things up from Katie's recipe.  Check hers out at....  http://www.dashingdish.com/2011/12/6th-day-of-Christmas-peppermint-brownie-trifle/ and then take a look at my version.  Either way you make it, this is a great dish...a great SUGAR FREE dish!!

Ingredients:
1 box Pillsbury sugar free chocolate fudge brownie mix
1 large egg
1 box sugar free chocolate pudding mix
1 box sugar free white chocolate pudding mix
2 cups milk (whatever version you use)
1 small container plain Greek yogurt (I used Oikos)
2 (8oz) containers sugar free cool whip
Peppermint Paddy sugar free syrup (or use peppermint extract like Katie did)
Peppermint crystals/sprinkles (the ONLY thing is this entire recipe that is not sugar free--you can omit them if you want---wait, that might not be a totally true statement---does milk and greek yogurt have sugar in it?  I dunno...but you get my drift...)  :-)
6-8 pieces of sugar free caramel mint Werther's candies, crushed


Start by prepping and mixing the brownie mix and baking the brownies.  Put the mix, one egg,  a few splashes of peppermint paddy syrup (I didn't measure...just eyeballed what I thought would work) and the Greek yogurt into your mixing bowl.  Blend together until mixed well....

I used almost the whole thing of yogurt...
there was maybe 2 tablespoons left in the container...
its safe to just use the whole thing!


Then, spray whatever baking sheet/pan you are going to use with non-stick cooking spray.  For this recipe, I used to small, round baking pans so the brownies would be thin...

Pour the batter into the pans and bake according to package instructions:  Keep an eye on them...they get done quick~!


While the brownies are baking/cooling, you can be prepping the rest of the goodies!

In two separate, large sized bowls, mix each pudding mix with only ONE cup of milk.  This step is important---do not follow the instructions on the box...just one cup of milk...that's it!  The pudding will get VERY thick as you stir and as it sets up.  Once each bowl of pudding is thick and set up, gently fold in to each bowl, one container of SF cool whip. Also, at this step add a couple of splashes of the peppermint paddy syrup to the chocolate pudding mix (NOTE: ONLY THE CHOCOLATE PUDDING MIX, NOT THE WHITE CHOCOLATE).  :-) 

See how THICK that pudding looks....that's normal for this recipe!


Then, for the fun of it...toss in some of the peppermint crystals/sprinkles into the WHITE CHOCOLATE pudding mix.... its gives it a nice peppermint pink color!!


Then, now that the brownies are cooled off (I took a short cut and removed them from the pans and placed them on plates and popped them in the fridge while I mixed up the puddings), cut the brownies into small, bite sized pieces.  Get a nice glass dish or trifle bowl to assemble the dish in.  I happened to have a pretty glass dish that my sister gave me a few months ago that worked perfectly for this!

Assemble the dish in your bowl by layers.  Start with a layer of the chocolate mint pudding, followed by brownies (spread out), then white chocolate pudding, then brownies, then chocolate mint pudding, brownies...and so on.  You want the last layer to be the white chocolate pudding.  Then, sprinkle some of the peppermint crystals/sprinkles on top and crush up the Werther's sugar free caramel mint candies and sprinkle those on top too!


Isn't it perty, ya'll?!?!?


I took it to work on the day my unit was assigned for treats day and the bowl was cleared out!  Everyone said it was good, too.  The best part?!?!  NO ONE knew it was sugar free!  When I told them, they were shocked! 

So, give it a try...its a simple and easy and WLS friendly dish...or for anyone trying to watch what you eat!  Sugar free means less calories and less fat than traditional sugar loaded (for lack of a better way to put it!!) stuff!   

Till next time....

Lots of Love,

Autumn